Step 1: Verify the specifications
- Get a working old laptop, boot it and confirm some information.
- “Windows Key” + “R” (“Run” window), type in “msinfo32” and click “OK”
- In the upcoming window, verify that…
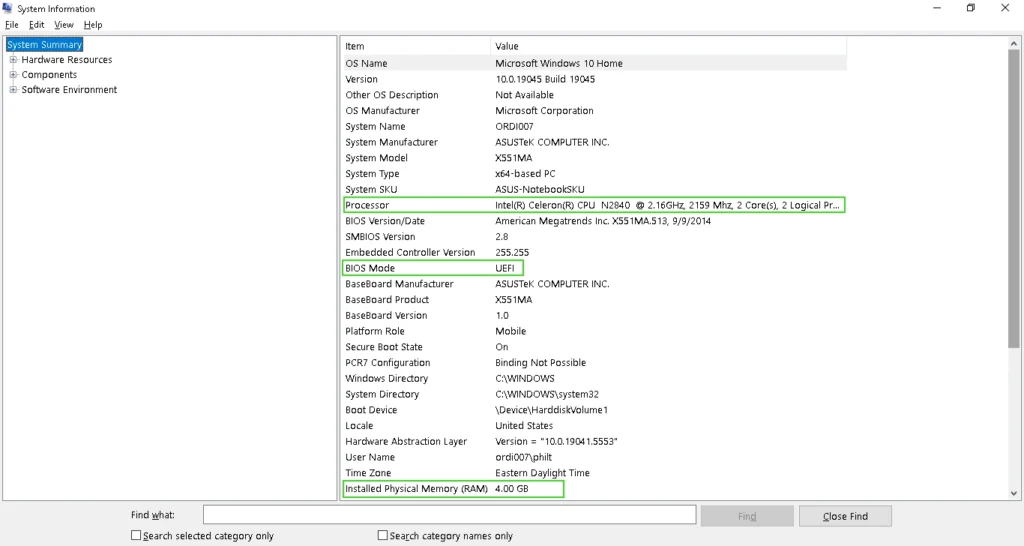
- “BIOS Mode” is UEFI, because this step by step document is done on a UEFI laptop
- “Installed Physical Memory (RAM)“, this will give you and idea of the laptop real potential:
- 4 GB and less, will do what it can !
- 8 GB, should do the job !
- 16 GB or more, should really do the job !
- “Processor“, the following links allow you to search for your cpu model.
- Intel Product Specifications
- AMD Processor Specifications
- If you don’t have the technological knowledge to interpret it, search for the launch date, if it is available, it will give you a good idea of what you can expect in term of performance:
- 10 years or more, will do what it can !
- between 10 and 5 years, should do the job !
- 5 years or less, should really do the job !
Step 2: Verify “BitLocker” status
- Further in this technical note, we will disable the “Secure Boot” mechanism. If you have BitLocker activated on your Windows partitions, the “Secure Boot” disabling could, for security reason, flush your BitLocker key stored in the TPM hardware module. If that happens, you would not only be unable to boot in Windows, but you would also lose access to your data on those partition.
- To remake your computer bootable and regain access to your data, you would have to re-enter those keys upon next Windows booting.
- This rarely happens, but since we really don’t want that to happen, we will print those keys on a sheet of paper before proceeding.
- To do that, open a Windows Explorer window and right-click on your “C” drive, like in the following screen capture…

- First, if you don’t have a lock icon over your drive icon, “BitLocker” is not activated and you can jump right away to Step 3.
- Then you choose “Manage BitLocker”
- In the newly opened manage window, you hit “Back up your recovery key”
- Finally, in the newly opened window, you hit either or both “Save to a file” and “Print the recovery key”
- It is highly recommended to print it on paper and keep it safe somewhere. That way whatever happens, you will never lose access to your data. For sure don’t save it to a file on that same disk… That would be totally useless, like a dog chasing its tail !
Step 3: Choose the partition
- “Windows Key” + “R” (Run window) and type in “diskmgmt.msc” and click “OK”
- In the upcoming window, look at your disk and partition…
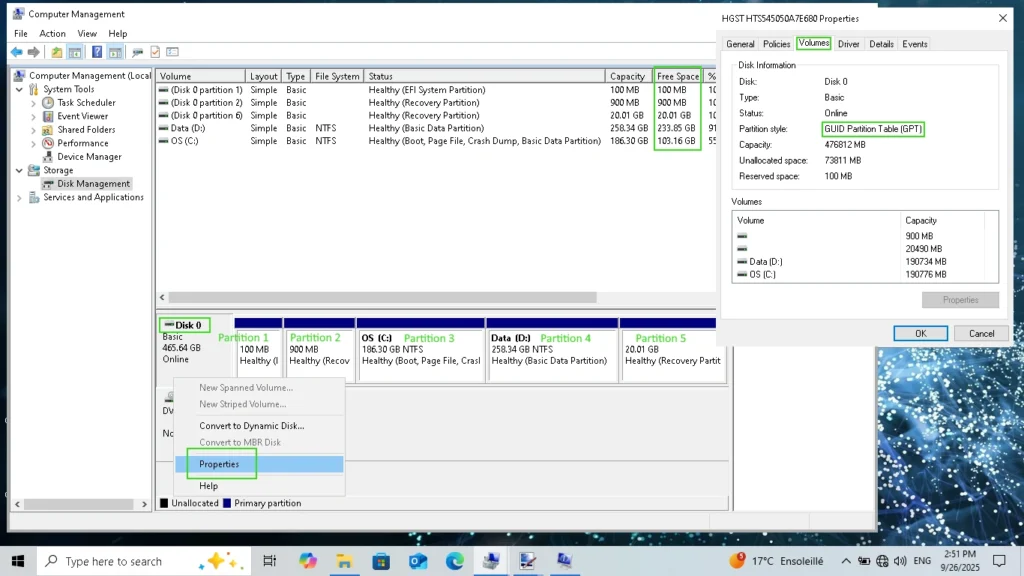
- You have to choose here the partition that you will shrink in order to make some space for a linux partition. The modification will not happen here, we will do it later with the LinuxLite installer. As an example, but you should have something similar, we have here a standard laptop partition configuration. You can see we have 5 partitions from left to right:
- “Partition 1” (100 MB): EFI, wheree the hardware/firmware look at the very beginning to boot your computer.
- “Partition 2” (900 MB): This is wheree we have our WinRE (Windows Recovery Environment), the blue screen troubleshooting environment that you get when you restart Windows in “Advanced Startup” mode.
- “Partition 3” (186 GB): This is wheree we have our C drive, the Windows operating system and usually most of your Windows applications.
- “Partition 4” (258 GB): This is our D drive, in our case we have a secondary data partition.
- “Partition 5” (20 GB): This is the laptop manufacturer recovery image that you can reinstall from WinRE if you end up with a corrupted Windows that can’t boot and/or can’t be repaired.
- You have to choose between your Windows partitions for which a letter is assigned, in our case between “Partition 3” for the C drive or “Partition 4” for the D drive. You should never play with the EFI partition or the recovery partitions anyway.
- You will need a minimum of 10 GB of free space to properly install LinuxLite.
- But we recommend to put at least 32 GB if possible.
- The “Free Space” column is a good hint !
- You can use a tool like WizTree if you need to free some space efficiently.
- Remember that you should also have minimally around 10% of free space in your remaining Windows partition after the linux installation.
- The disk hosting the partition must be formatted using a “GUID partition table (GPT)”, it should be the case even with a very old laptop, but you can verify that easily:
- Right-Click on the the disk on which you want to install linux,
- Select “Properties”.
- Select “Volumes” tab.
- In our case, we choose “Partition 4” on “Disk 0”, the “D” drive with a capacity of 258 GB and 234 GB of free space, which is far more than necessary. For now, we do nothing, we just note the size down. The size is the way we will be able to match the partition in the linux installer later, because you may see more partition there and only the size and their order will be the same than here.
Step 4: Prepare the bootable USB key installer
- Insure you have download LinuxLite and Rufus, It’s important to have the latest version of both.
- Pick a USB key of 8 GB or more that you can format and launch your newly download Rufus tool. We will make the USB key bootable and will copy LinuxLite installer image on it.
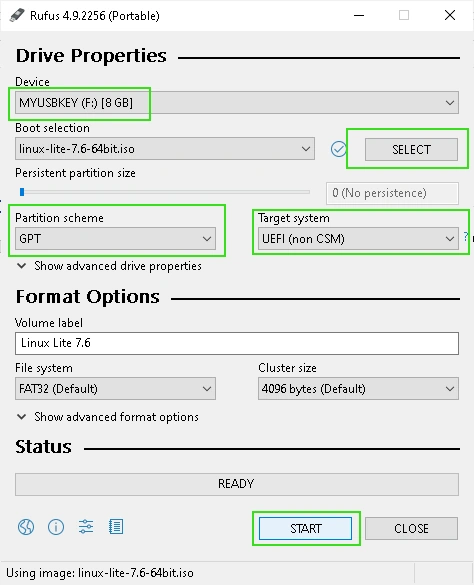
- In the “Device” combo box, choose your USB key
- Click on the “SELECT” button and choose the LinuxLite installer “.iso” file, that you download.
- Set “Partition scheme” to “GPT” and “Target system” to “UEFI (non CSM)”
- You can verify the rameining option, but by default they should already have the good value, like we have on the image. When you are ready, you simply click on “START” and wait a few second until the operation is done.
Step 5: Disable Secure Boot safely
- This step is optional but highly recommended, on some computer, depending the UEFI firmware “Secure Boot”, the install process may work with it enabled, but on many, it may fail. In most case, you will be able to re-enable it after the install is completed and successful.
- Restart the computer while holding pressed a key or key combination during the very beginning of the laptop booting. In our case, it’s “F2”. If you got the correct key combination in time, you should get a screen similar to below, but make no mistake from a laptop to an other it can be very different, more recent laptop even have graphical interfaces…
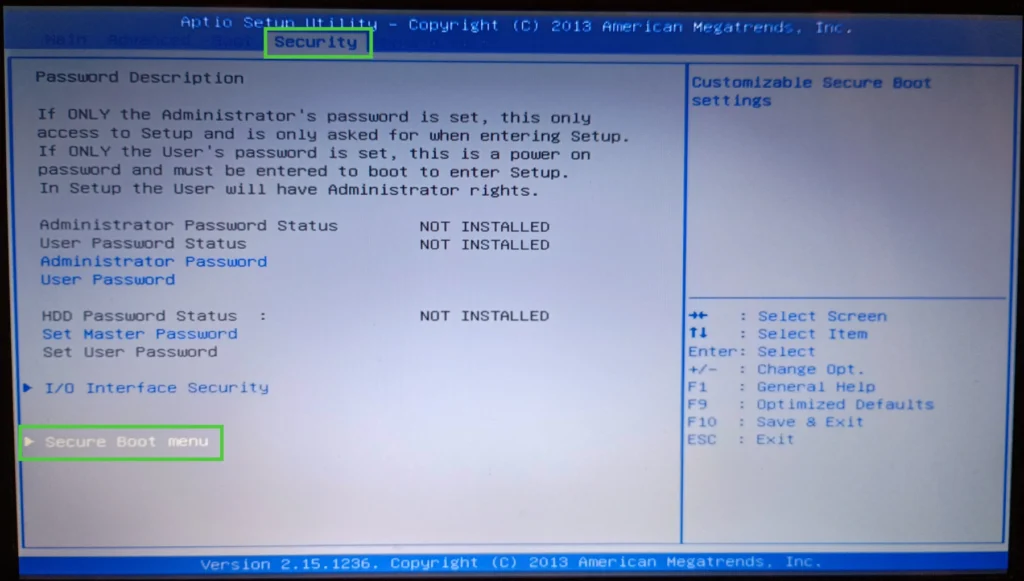
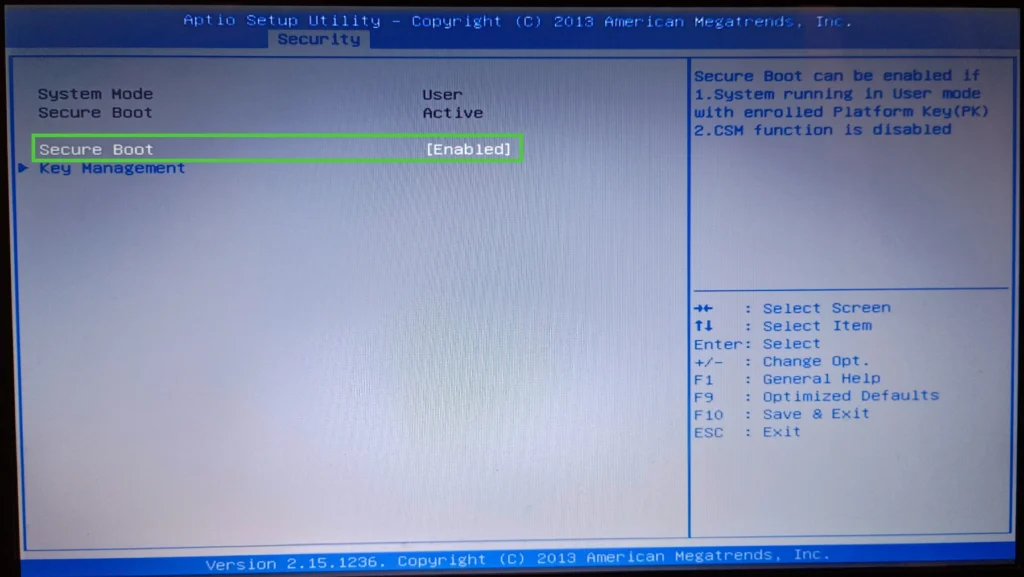
- This is the UEFI firmware part interface (formerly called BIOS), it can be very different from one computer to an other, but whatever, you should always find the same kind of elements.
- You should have a place to configure the security options, including the activation of the “Secure Boot” mechanism. In our case it is in the “Security” tab and then in the “Secure Boot menu” element.
- You navigate there and disable it. Then you save and reboot, in our case using “F10”, as shown on the help, on the right part of the screen.
Step 6: Boot from the USB key
- They USB key we prepared host the installer but it also host a working linux installation. We will be able to run linux directly from it and/or launch the install process.
- The first step is to boot the host computer on that USB key instead of on the main Windows “C” drive. Obviously, you need to ensure your USB key is plugged into your compouter.
- Restart the computer while holding pressed a key or key combination during the very beginning of the laptop booting. In our case, it’s “F2”. If you got the correct key combination in time, you should get a screen similar to below, but make no mistake from a laptop to an other it can be very different, more recent laptop even have graphical interfaces…
- This is the UEFI firmware part interface (formerly called BIOS), it can be very different from one computer to an other, but whatever, you should always find the same kind of elements.
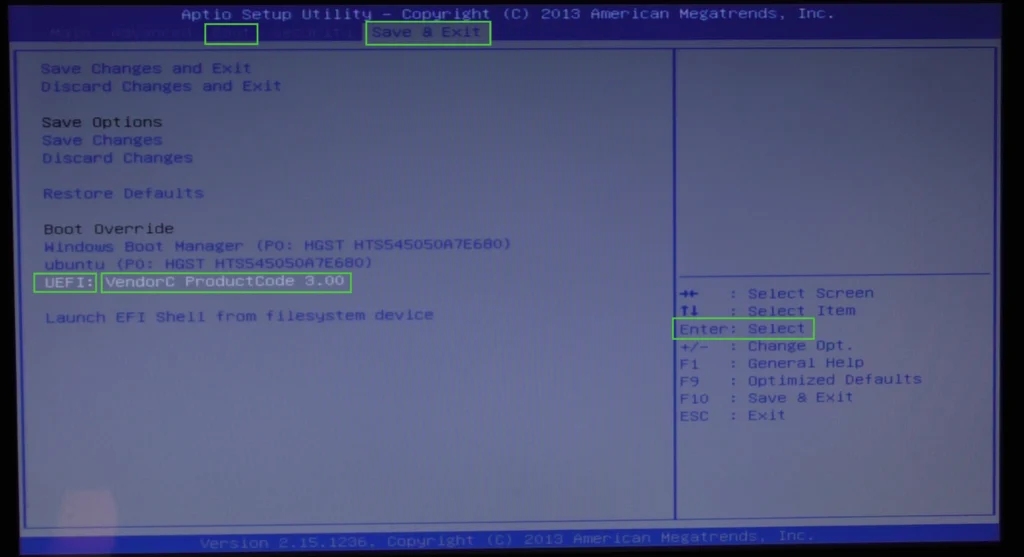
- You should have a place to define the device entry order the firmware looks in to find a proper EFI partiton, or ESP, and where you can just decide wheree to look for the subsequent boot. In our case it is the “Boot” and “Save & Exit” tabs.
- For the install process, we will prefers to just override the boot order and not change it, but both option will work. What is important is to choose the entry that refers to your new USB bootable key. In our case it’s a cheap unbranded USB key discovered as “Vendor C ProductCode 3.00”. So we select it with the keyboard arrows and hit “Enter” key.
- Once successfully booted on that key, you should see a screen similar to that…
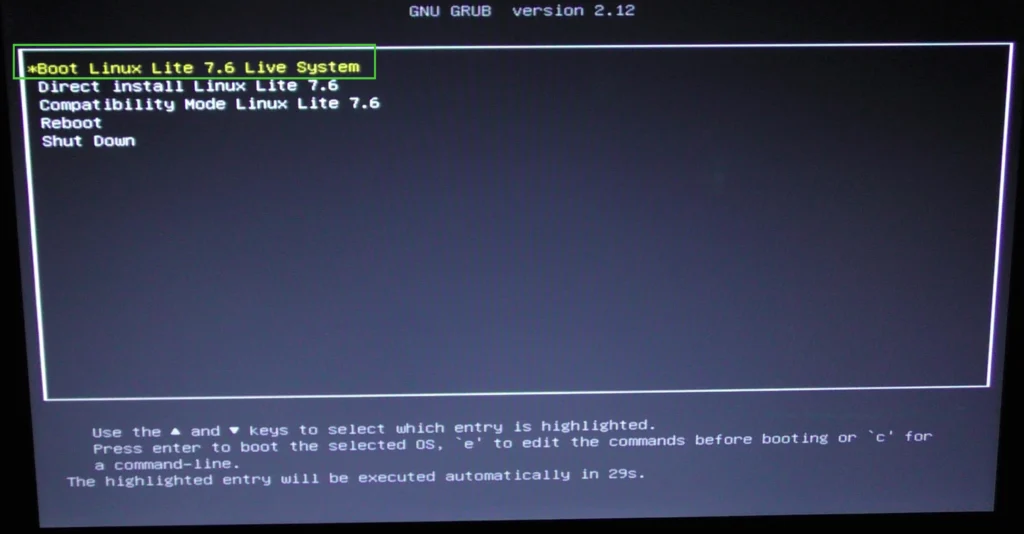
- You should choose “Boot Linux Lite 7.6 Live System” to boot LinuxLite directly from the usb key. It will allow you to try it before proceeding with the installation. It will ensure you that your laptop should work with linux. Once boot, don’t expect big performance since you are loading linux from the usb key, but you will be able to minimally try it, and, for example see that your wifi or ethernet card, your video card and sound card are supported.
Step 7: Install LinuxLite
- Once boot in LinuxLite from you should have a screen similar to that…
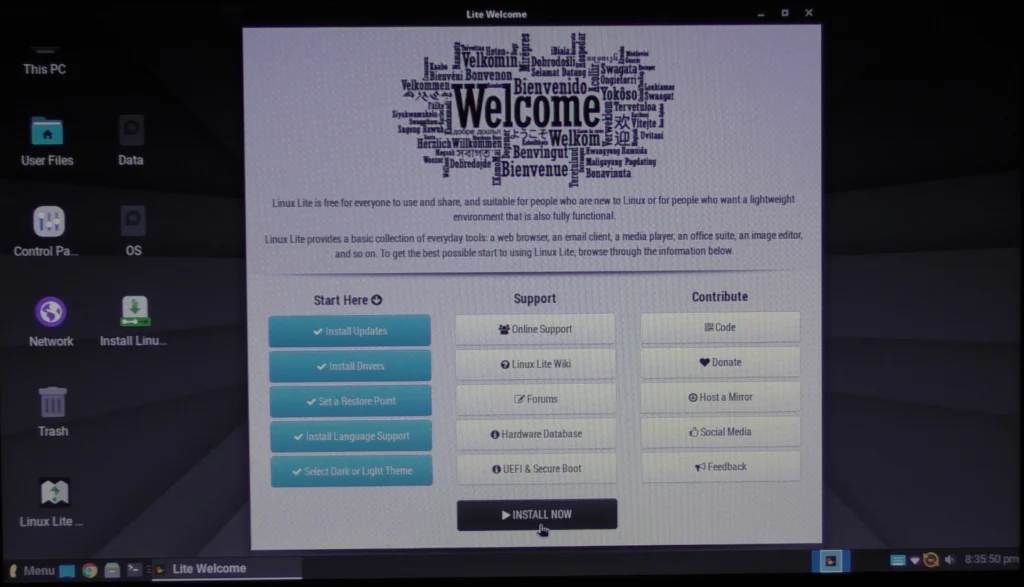
- Take the time to do a little tour to be sure every thing seem to be fine and you like it at least a little bit !
- Then click “Install Now”
- You will then be ask to choose your language and keyboard layout.
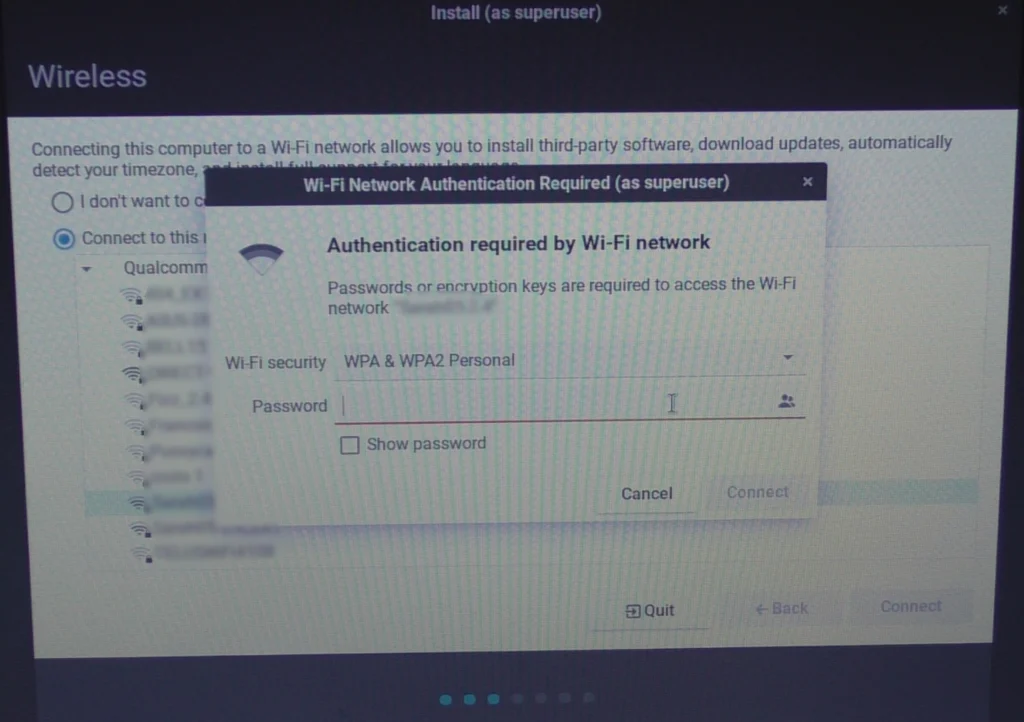
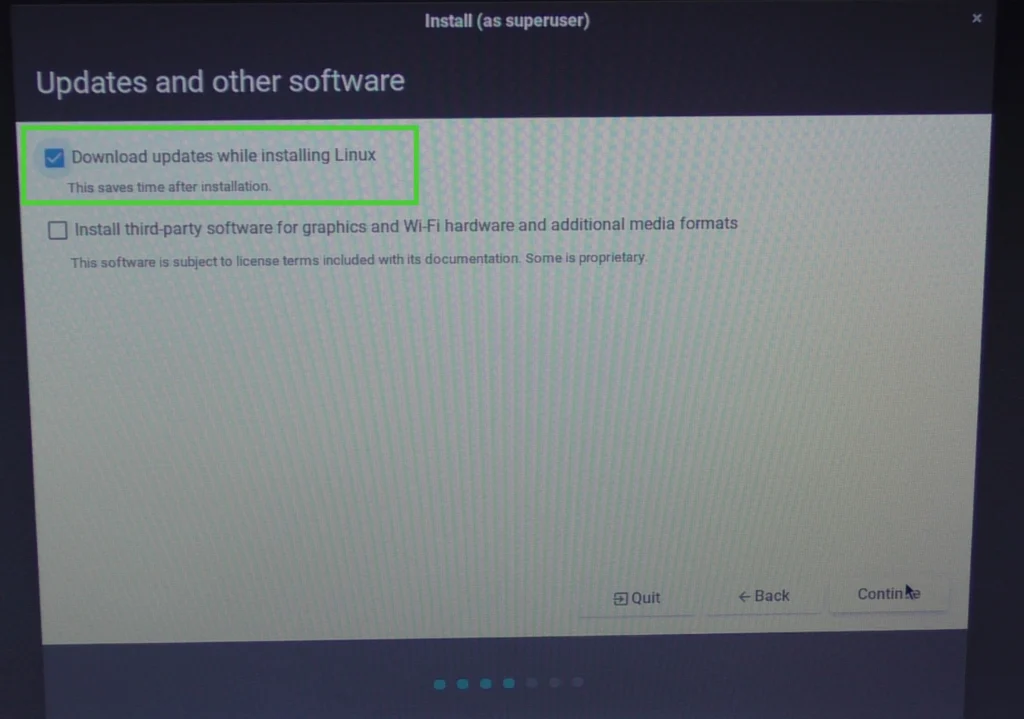
- Then you will be able to configure your network connection, It is optional, but it is recommended to do it it will allow the installer to download more recent version of compoent if required. Don’t install the third party, you will be able to do it once install is done, and it could stall or make the actual process fail.
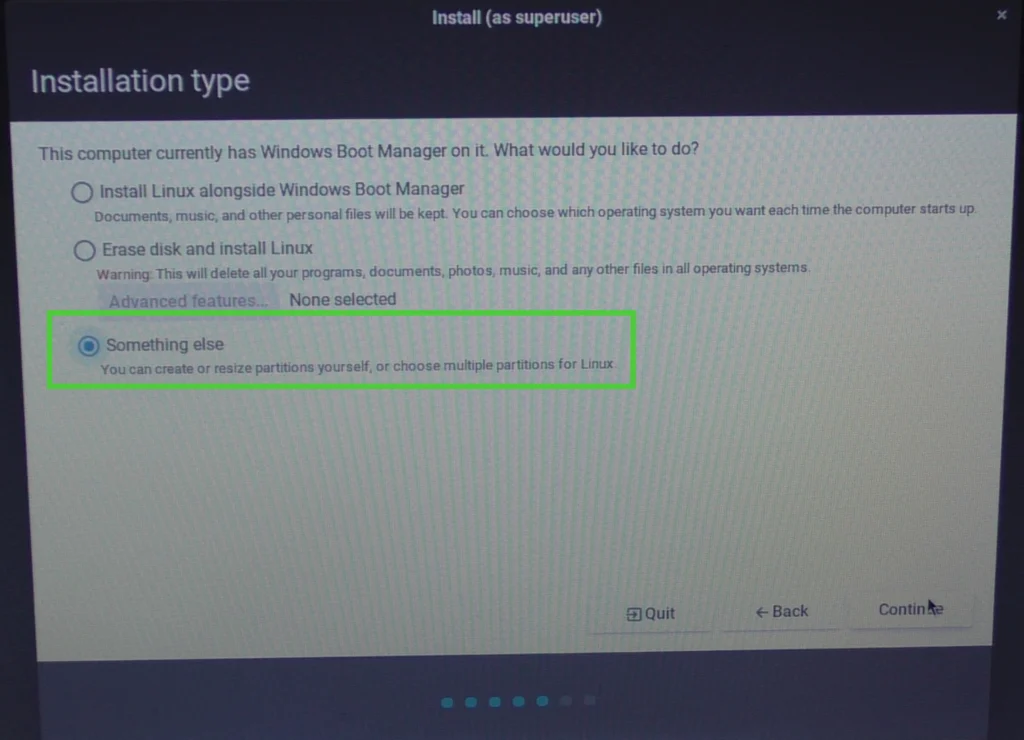
- Now we are at the crucial step of the install, you have to be cautious, the action that you will make in the folowing screen could erase your Windows and put you in a state wheree you have no choice to reinstall it or even loose all your data. If it is a senstive issue for you and you are doing such a process for the first time, we highly recommend that you backup your important data on an external hard disk.
- The folowing screen gives you 3 choices, explained below :
- Install dual boot with Window using the isntaller wizard.
- Erase Windows and install linux. In our case, we obviously don’t wan’t that, since we want to keep our windows and the hability to boot on it.
- Install dual boot with windows, doin your partition by yourself.
- While the first choice sound easier, at this step you want a total control, especially if you have more than one Windows partition on the main disk, which is our case. So we wil choose the third options…
- The next screen present you the actual paritions of your computer disks. It is more complex and detailed of what you saw earlier in Step 2 on Windows.
- You may see here more partition below, but the order is the same and the size of the matching paritions are the same, while not in the same unit…
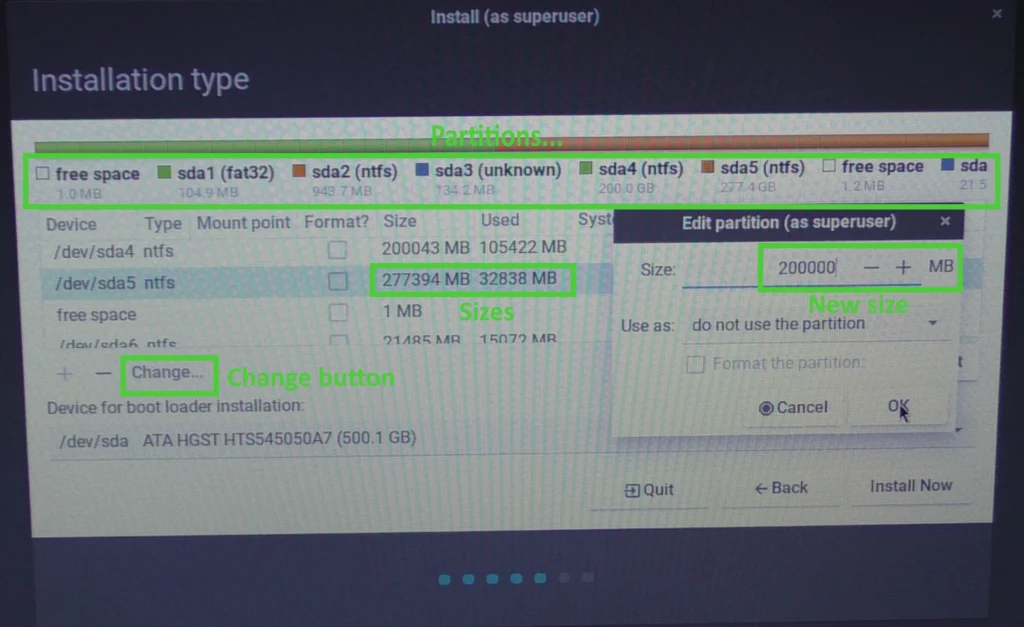
- Here also we have a horizontal bar to represents our disk. The first step is to find the parition you choose in Step 3 and shrink it.
- We have one more partition and two “free space” segments. But again the order here is the same than in the Windows horizontal reprepsentation. And the size will match, they look slightly higher here because they are calculated to bigger unit using 1000 as factor while in Windows, 1024 is used.
- Our D drive in Windows is here partition /dev/hda5.
- Hit the “Change…” button; be cautious: don’t hit the minus “-“, since it would later provoke the erasing of the partition.
- This bring the window allowing the resizing of the parition.
- In our case, we reduce it to 200GB, letting us more than 77GB. Thius is far enoush since, as said, you need a minimum of 10GB for linux, but we recommand at least 32GB,
- The other thing you have to plan is the remaining free space for the Windows parition, which should at least be 10%. In our case, shrunk to 200GB with a used size in Windows of around 33GB for a free space of around 83%, which is obviously far more than enough.
- Once you hit “Ok”, you will have a confirmation screen. After that you will have completed the first real modification to your disk…
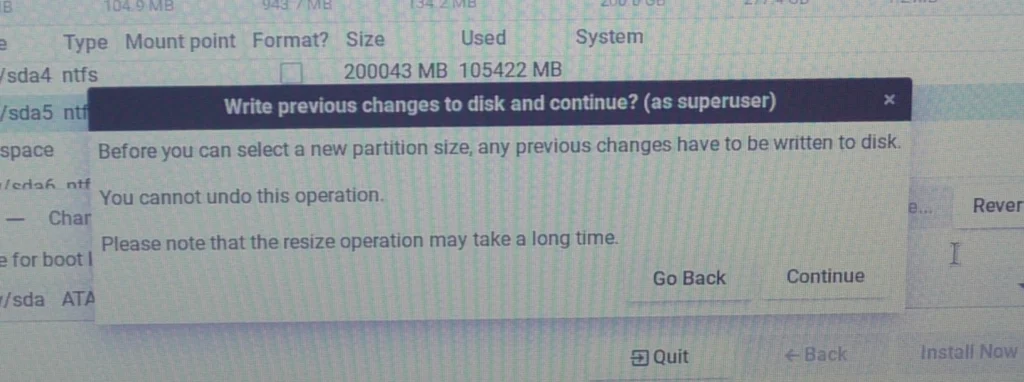
- Last chance to “Go Back” ! If you are ready, hit “Continue”.
- We will now create our linux root partition…
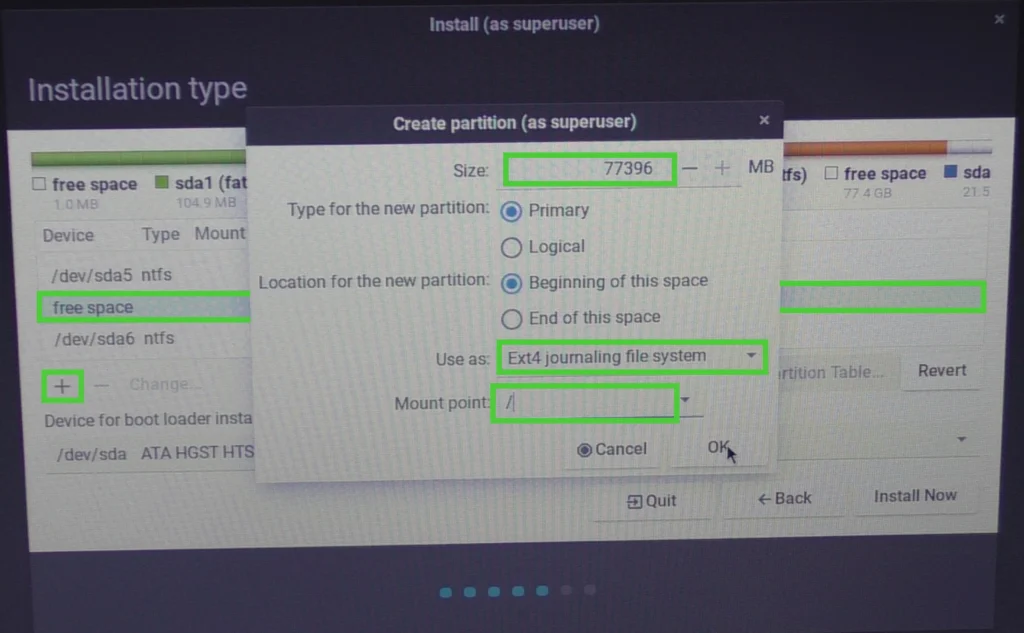
- You can now select the “free space” segment created byt the previous partition shrinking anf hit “+”.
- In the “Create parition” screen that appear, you can double check the size of the partitionthat you will create, it should already be filled int, in our case it’s “77396” MB.
- In the field “Use as”, select in “Ext4 journaling file system”.
- In the field “Mount point”, type “/”. This will be your root partition in the linux semantic and in our case our only partition. You could have far more complex partitionbning scheme, but on an old computer that is not used as a server, it would be useless and overkill.
- When you are ready, hit “Ok”, you should now be able to see your newly created partition…
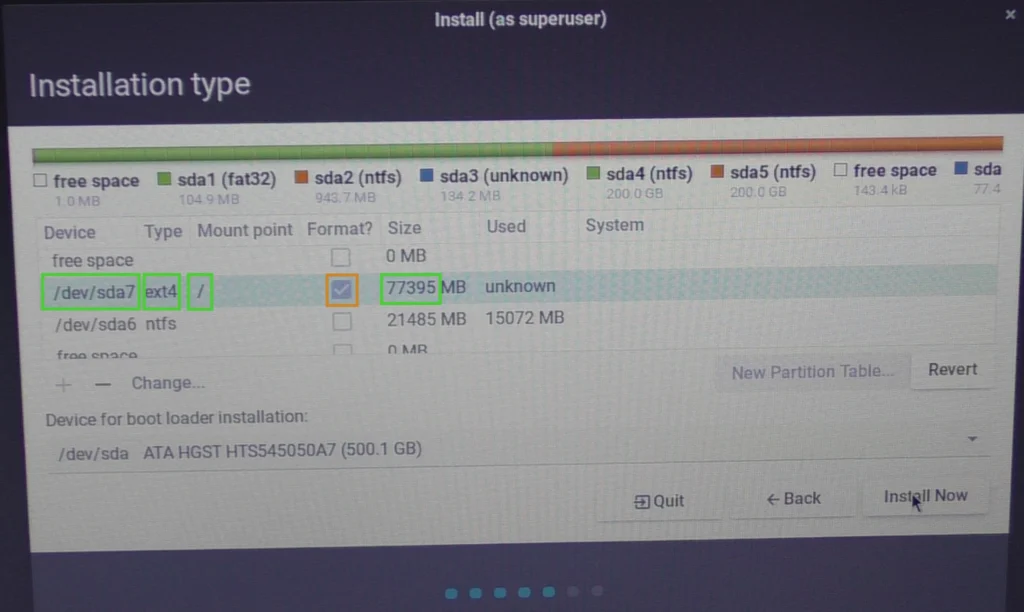
- You can see that the installer assigned it to a device path, in our case “/dev/sda7”
- You can double check that it as the proper “ext4” type, mount point “/” and a size of “77395”, that can slightly vary from what was in the “Create partition” window.
- It is highly recommended to check the “Format” column.
- When you are ready, hit “Install Now”, which should bring that second confirmation screen…
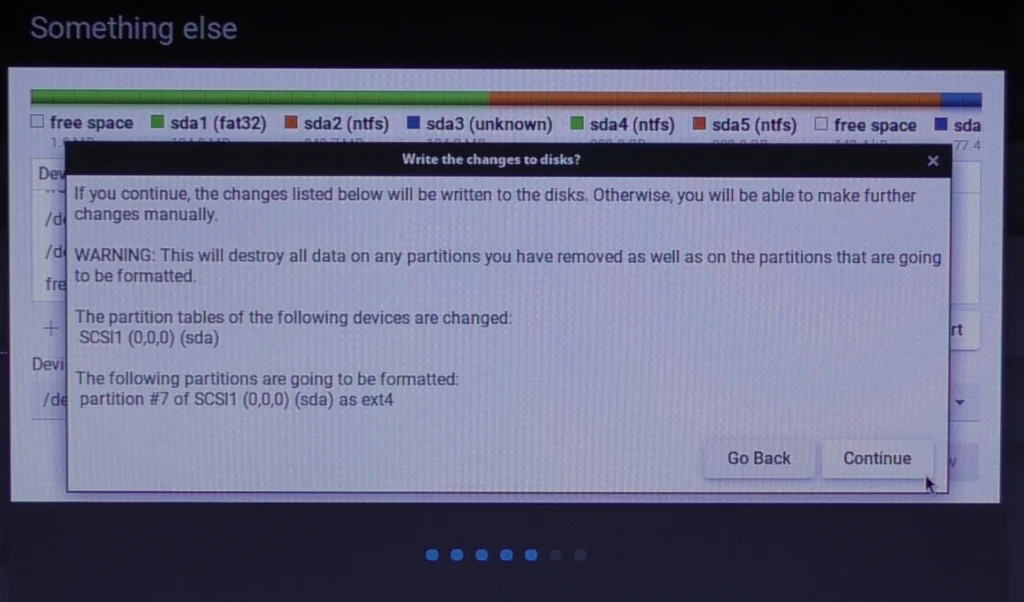
- You have a last chance to “Go Back”, but make no mistake the shrunk partition is already shrunk, even tough, if you really want, you go regrow it in Windows.
- If you ar eready hit “Continue”.
- You will have some other config screen that we will not go through since they are trivial.
- The last important one let you specifiy some important nominatives informations…
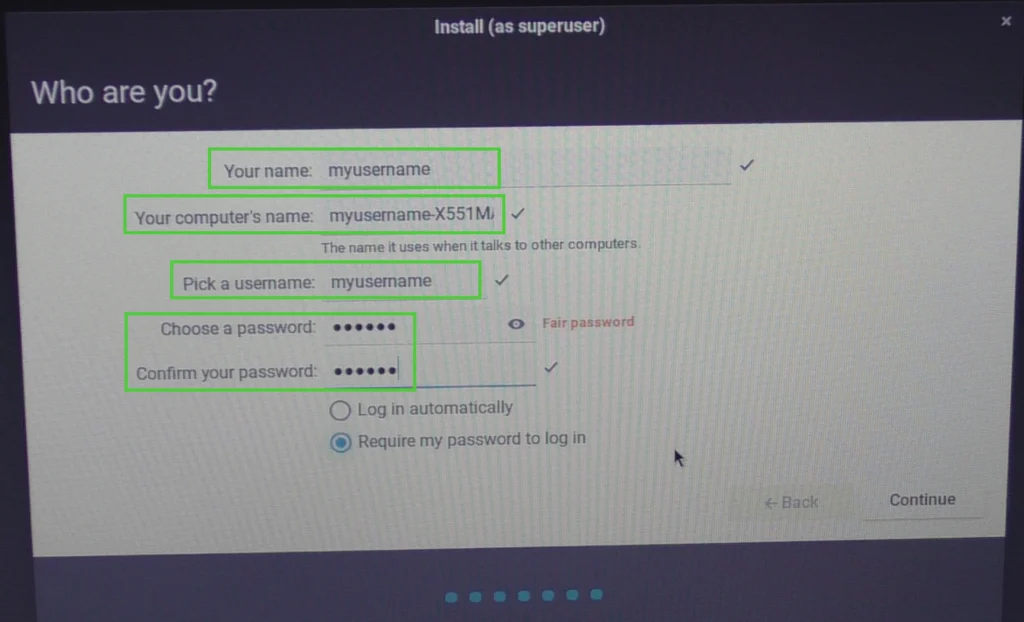
- It is recommend to set those field with the proper value since they can be a bit cumbersome to change later on.
- To ensure you set the password you think you typed, it is also a good practice to use the “Your name” field, which allow most printable characters, to test your actual keyboard mapping.
- Then you hit continue and you wait till the end, you will have a popup that confirm the successful installation and offer you to reboot…
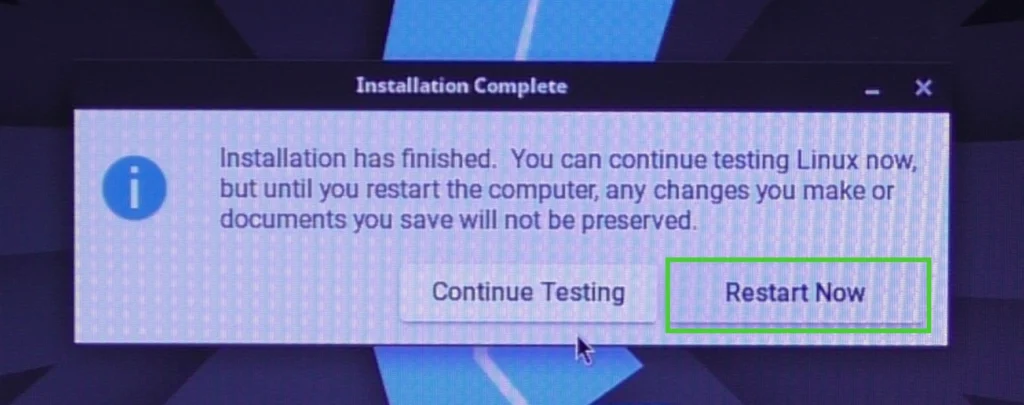
- You hit “Restart Now” and you will then be asked to remove your USB key and hit “Enter”. You may see a few error message during the process, they are not necessarly critical.
- If you didn’t change your boot order, you wil have to do it and again hold your computer specific key or key combination to go back in the UEFI firmware like you did in Step 5 and Step 6…
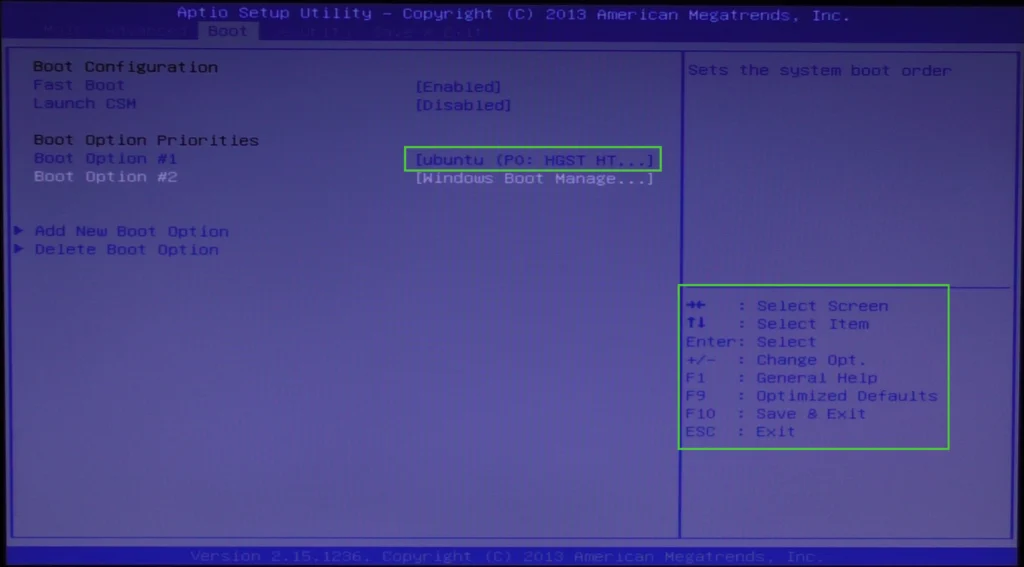
- Depending your UEFI Firmware, the actual operation can vary, but following its available help, you should be able to change the boot order and put your newly linux install first in the order. Its label will start with “ubuntu”.
- You will always be able to change that later if you prefers to go back to Windows by default. And from the “ubuntu” launcher, you will be able, each time you boot to decide if you go in Windows or in LinuxLite.
- If everything went fine, upon booting your computer you should now always be greeted with that new launcher…

- Well Done ! Congratulations !
- Now, choose “Ubuntu”, and enjoy !
Final considerations and reverting…
- When you are sure everything is working, you can try to re-enable “Secure Boot”. If it starts failing after that, you will have to leave it disabled or toggle it when you swap between Windows and LinuxLite, which would be really annoying.
- If you are asked to enter your “BitLocker” key, use the paper you printed at Step 2.
- If you ever change your mind and want to get rid of Linux, it is very simple: